23 December 2014

Wash Day: Twist-Out Game on Point!

Hey Peeps! Happy Holidays!

I took my marley twists out and figured my hair needed a good ol' deep conditioning after. So that's what I did (on Friday morning). So here goes my #WashDayExperience:

[1] Deep Conditioned with a warm mixture of Creme of Nature Argan Oil Intensive Conditioning Treatment, Roux Porosity Control, a dollop of Organics Hair Mayonnaise and some Castor Oil. I put my hair into 6 sections and applied the product one section at a time. I did this because I was getting worried that the products I've been putting in my hair were not being distributed evenly..But man was it time consuming! And the fact that my hair is very dense did not make it easy on me! Sheesh!

I then used my blow drier to warm each section as best as I could for about 15 minutes. I let it cool then rinsed it out.

[2] Conditioned with Herbal Essences Hello Hydration conditioner (HEHH), again section by section. Rinsed it out.

[3] Spritzed Apple Cider Vinegar (ACV).

[4] Air dried for about 20 minutes.

Now on to the BOMB.COM niceness! The twists!

[5] Applied my DIY Leave-in (Aloe Vera juice + conditioner + Coconut oil + Water) then a little more Coconut Oil then my DIY Shea Butter mix and twisted my hair. 

GLOREHH for Aloe Vera juice! Omigoodniss! It was exactly what my hair needed! I put it in my hair and instantly my hair felt softer! Lol you guys don't know how much it means that I've finally found something that softens my strands. Aloe Vera juice (we call it Sinkle Bible here in Jamaica) is easily accessible and I can get it for free from co-workers and colleagues so I am beyond ecstatic lol.

Ok. So I twisted my hair for an event I went to on Friday. The twists turned out wonderful. I didn't get to take pictures of the twists only. Bummer.

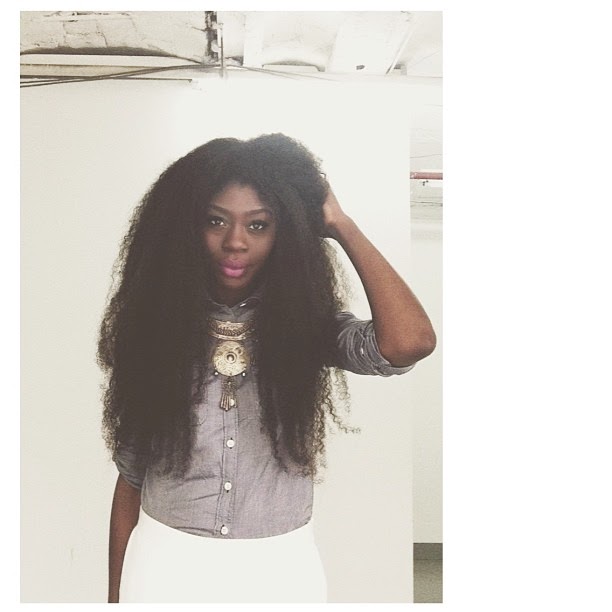
The next day they shrunk and resembled chunky twists ...and because I had another event to go to (Rotaract Christmas Dinner - Go Rotary!), I re-did using the same LOC method mentioned above and they came out spectacular - again. I remembered to take some pictures. Here goes: 


Since it's the best twist-out I've ever done last weekend (and from a Wash Day no less!), I now feel empowered to wear my hair out more often :). I'm even considering wearing my natural hair out for the holidays!

Hope you all had a great Wash Day and a great weekend!

The Wash Day Experience

Be well,
Gibbie


10 December 2014

Quickies: Marley Twists - Redux

Hi there.

Remember this post about how my Marley Twists were a Protective Style fail? My natural hair was stickng out all over the place and it was just not neat enough to keep in. I was seriously thinking of taking them out when I did a "last look" on YouTube to see if there was anything I could do to salvage the hairstyle.

And it so happened there was.

After looking at a few videos, I started to unravel the twists and re-did them - this time using half (or less) of my natural hair per twist and more of the Marley hair to do the twist. I did this process one twist at a time. Eventually I used two (2) packs of hair (Yah Man brand) to re-do my whole head. Here are the results:


Yay! (in my Rotaract shirt #GoRotary)

I'm glad it turned out well! I feel so accomplished! Lol. So now I have installed (in my whole head) Marley Twists and Crochet Braids! Styles with my own natural hair are next! Woot Woot!

Be well,
Gibbie

05 December 2014

6 Month Length Check (6 Months Post BC)

Hey guys!

It's now been six (6) months and one week since I did the big chop. Time seems to be going nicely and my hair has been flourishing since I asked my boyfriend to cut off my relaxed ends in June 2014. There were a little bit of tears. There was a lot of bit of shock lol.

But without further ado, Here are some pictures of my 6 natural hair month progress:


The morning after the Big Chop - June 2014


July 2014 


November 2014


December 5, 2014


Aaand there you have it folks. Now that the pictures are up, I can see the difference in growth over the time period..and I'm happy \o/ lol. It would also seem that my regimen is doing okay thus far..so at least technique-wise I won't be changing anything.


Some things to bear in mind (or err..disclaimers? lol)

  1. I transitioned for about 7 months before I cut my relaxed ends off (so I had a little over 2" before the big chop)
  2. My hair grows a little over 1/4 inch per month (0.375 inches exactly lol)
  3. I cut off quite a bit of relaxed ends in about July (apparently I was even cutting off my natural hair with it -_-)
  4. I wear protective styles about 85% - 90% of the time

Be well,
Gibbie


03 December 2014

Wash Day: A Thorough Deep Condition & PS fail

I rather, my curl-friend Trudy did a "shingling" or what others would call a "Wash & Go" on my hair on Tuesday. I used water, extra virgin olive oil and Curls Unleashed gel to smooth the hair until ,y curls set. That lasted until thursday. It isn't for me..it was what seemed like a crazy amount of gel to get my hair to form some curls - it was almost like I was forcing my hair into something it's not. I did realise however, that there are at least three (3) textures on my head: curly in the middle and crown, little to no curl definition almost everywhere else and a straight section at the front of my hairline. Crazy. Anyhoo, here goes my #WashDayExperience:


[1] Cowashed with VO5 Tea Therapy Clarifying Conditioner. I did this to get out the crazy amount of gel residue that was in my hair. This conditioner is more moisturising than the VO5 Herbal Escapes Clarifying Conditioner and it's the best VO5 conditioner I've used thus far. After rinsing it out, my hair felt softer than expected and I was happy.

[2] Deep Conditioned with Creme of Nature Argan Oil Intensive Conditioning Treatment for about 1 hour. I put my hair into five (5 sections), went through and detangled each section, then added some of the DC at the ends and sealed the sections with some castor oil. I was using this product during my texlax and transitioning period and it worked well then. I was searching for a new DC and I would start with an old faithful.

[3] Cowashed with Herbal Essences Hello Hydration conditioner.

[4] Air dried for about 25 minutes.

[5] Added my DIY leave in + castor oil + DIY shea butter mix.

[6] Flat-twisted my hair and left in until the next day. And on Friday night, I twisted my hair with some marley hair extensions. I was inspired by NaturalRose on YouTube (love her voice), where she installed marley hair extensions as a protective style see link here). It was simple and it was easy and I liked it.

I underestimated a couple of things: 1) my hair's density/thickness 2) my technique (still don't know where I went wrong) and 3) how many packs of hair I would need - I had to use 2 packs..and even now my hair is jumbled with hair sticking out under the extensions. I didn't like it. Here's a picture of how it turned out:


The plan was to keep the style in for 2 weeks..but if it stays in any longer I'm going to poke and prod at it, which would defeat the purpose of a protective style. So that's that.

Some observations I've noticed from my wash days of late: 
  • I had to readjust my technique for applying product. I am now just noticing that when applying product, I tend to put the product on the top of my hair and "rub it up". Madness. Knowing that now, I've started to section my hair off, go through my hair with the product, applying from root to tip on all strands and a little extra on the ends. I hope no damage has been done. My hair ends have been feeling a little rough so I surmise that has something to do with it. If more deep conditioning doesn't result in better ends, I'll be snipping them off.

  • I have also noticed that my hair doesn't like "out" styles. It gets soo dry so easily. And, since I'm not really that verse on combing my hair at this length (still waiting on that length for roll, tuck and pin styles lol), I think I'll be doing more protective styles just to be on the safe side.

I hope you all had great wash days as well and I look forward to reading them all.

The Wash Day Experience

Be well,
Gibbie

16 November 2014

Hits & Misses: Vixen Crochet Braids

Hello there,

After 5 weeks of having my last protective style in, I took them out and installed another set of crochet braids in - this time using a vixen crochet braid technique. I learned this style from Mary K on YouTube (click here for the technique), where the hair is parted in four sections and canerowed/cornrowed into a beehive style. The hair is then crocheted and can be worn in a series of styles and which makes it more natural looking when parted and styled. Here's a picture of how it looks:

(Source: Goog;e images)

In the link above, Mary K uses Kanekalon "braid" hair, crochets the hair in, blow dries and flat irons the hair, then flat irons her leave out (the section that meets in the middle in the diagram), and everything blends flawlessly

So anything nice and simple, mi inna it.

And I attempted it.

Didn't work out so well.

Gibbie wasn't going to flat iron her natural hair . She also cannot canerow/cornrow well. so she asked a friend to do the braid pattern and used a Kanekalon braid hair that has a more natural look to it called "Nappy Annie". 

The results? HORRIBLE.

The leave out was too much.

The hair had too much sheen, would not blend with my natural hair, barely curled and would not maintain that curl.

It was no bueno. It had to go.

I did the style that date mainly because I had an outing to go to and now it didn't turn out well. After panicking and trying every possible way to make the style work, I finally came up with this:

I'm grateful no one did a close up lol.

On Monday, I cut the hair out, bought regular kanekalon hair, crocheted it in, braided the hair into about 6 sections and dipped it in hot water.

By Monday evening, it looked something like this:


and on Friday:


I was unable to fix the middle how I wanted it, but it was fairly decent.

Call me the fixer lol.

I think I've figured out my mistake with this install (my natural hair is not long enough/shrinks too much for a vixen crochet style) so next time around I'll be doing a partial leave out (just the front). 

All in all, I'll be taking this style out shortly. It was originally installed last week but I doubt it will be in for long. It was still good to try something new and I'll be doing another (adjusted) crochet braid style soon.


UPDATE: Today I was feeling a little better about this style. This morning I wore the style out after hot-watering 4 braids and twisting the leave out (my natural hair). I took this picture 5 minutes ago:


Not looking too shabby and the blending of both hair types looks good to me! Lol. I'm redoing this style (with some tweaks here and there) soon and I'm adjusting my previous comment as to how long I'll keep this style in - it's going to be around a little longer than I initially thought. I don't mind it that much anymore! Cheers and have a good one! 

Be well,
Gibbie

14 October 2014

Protective Styling It: Crochet Braids

Fresh off a nine-week-long protective style run and my birthday coming up in the following week, I installed Crotchet Braids in my hair. I chose this style because it seemed like one of the better protective styles to do that wouldn't cause additional stress on my strands (because it didn't much of a break between styles). I wanted low manipulation. Matter of fact, I wanted no manipulation. So here goes it:

Details
Hair: Bijoux Realistic Marley Braid
Price: $570-$600 JMD per pack
Colour: No. 1
Duration: About 3 hours
Number of packs used: 3 (all cut in half)
Installed by: Meeee!! (with cornrows/canerows done by my friend Trudy)

I was a little intimidated to install it myself but hearing the cheapest price to install crotchet braids was $4,000 JMD, I said NERP wid a quickniss!, ventured on to YouTube to reinforce the technique, then  got to work.

I let out my usual area at the back of my nape, twisted it, got the cornrows in and did the install. I separated each "clumped" piece of hair that came in the pack and further separated the hair into more pieces as I got to the front for a more "cleaner" look. After it was done, I didn't comb/brush the hair and wore it as is. When it was done, the hair was Diana Ross big and I absolutely LOVED it! I felt so accomplished! lol. A couple of days later, here are some pictures:


Roll, Tuck & Pin yesterday


Birthday..night (first picture I had since the install - forgive me for the repeat lol)

The (now) usual hair at the nape that I left out, twisted.

There has been no discomfort, nor do I feel any tightness or stress on the scalp. The plan is to moisturize the braids and leave out at least than once a week and moisturize my edges almost everyday, mainly because that's the area that is out and tends to be dry. I intend to do a wash once every 2 weeks and overall I'd like to keep this style in for about 4-6 weeks. When majority of the curls have gone, I'll comb or brush the hair out and do a perm rod set so they'll hold over to 4 or 6 weeks until take-down. I'm very proud of doing this hair style and, among other things, my thrifty cheapskate self is grinning, having saved myself some $$$.

In a few days I'l be doing a wash/semi-wash day and I'll document that to see how goes it. Hope your hair journey is going well in your neck of the woods, as is mine.

Be well (and hair happy!)
Gibbie

11 October 2014

Birthday Hair Tag! Mhm!

Hi all!

I got a Birthday Hair Tag from fellow hair blogger Rachel from Rachie To Waist Length click here for her blog and seeing as how my birthday was this week I was in for it! It's a short post but before I jump in, here's a picture from my birthday shenanigans:

'Twas a great night :)
 Now let's get to it!


  1. What's your real name? Thadene (pronounced Tha-deen)
  2. When's your birthday? October 8th (last Wednesday :D)
  3. Curly or straight hair on your birthday, and would you wear it up or down? Protective Style: Curly - Down || Natural hair - Curly - Out 
  4. If you were to receive a hair product for a gift, what would you choose? Shea Moisture Restorative Conditioner 
  5. Whose hair would you trade places with for a birthnight? My hair at DesiréeVennFrederic's (@xodvf) length. Looking like this:

      
Coo deh

Watch deh <3

6. If you had to use a single brand of products for an entire year, which would it be? I don't use any one brand of product so err..pass?

7. You get a $20 birthday gift card, what 3 (cheapie) products, tools and/or accessories do you buy? Herbal Essences Hello Hydration Conditioner and a pack of large bobby pins.

8. You are getting ready for a fabulous b/day outing, DIY or hair salon? As I did this week, D.I.Y! I can't bear waiting times at a salon.

9. You overslept, your hair isn't done, you've got 30 minutes to do it, what style do you execute? With this Protective Style: Hot water flexi-rod set || Natural Hair: Roll, Tuck & Pin.

10. What wish would you make for your hair? That it be eternally breakage free. Amen.

11. If your hair was a type of birthday cake, what would it be? Potato Pudding-esque. 

12. Finally, what hair-related gift would you give someone for their birthday? All the knowledge I've gleaned on how to take care of black hair. It saves mistakes and setbacks when you know what you're doing and gives you the tools for a successful hair journey.

Aaand that's all folks! This Birthday tag was pretty awesome to do..got me to thinking a bit lol. Hope you have fun reading it as I did doing it :)

Be well,
Gibbie

06 October 2014

Wash Day: Yarn Locs Take-down, Protein Treatment & A Newbie

Hi all,

I finally finally woo-lawd took out my yarn locs on Thursday after having them in for 9 weeks. I didn't miss my hair this time but I was tired of seeing the style in my hair. It was fuzzy and although that added to the "realness" of the style, I was just plain ol' tired of seeing it. Prior to the take-down, I did my regular weekly co-wash and did a tea rinse to reduce the amount of shed hairs I expected to see when it was time to take down the style. To aid with the take-down, I used some of the diluted conditioner mix I used for my co-wash, finger-detangled each section of hair taken out of the loc, then twisted every 2 pieces I took down. It took a little time to complete, after which it looked like this:


Since it was late when I finished, I let the twists stay in, rolled and pinned my hair (word to Rachie) and wore it to work. I also did a little snip of the ends and let the twists stay in for wash day - not about that hours-long detangling life. So without further ado, here goes my #WashDayExperience:


[1] Shampooed with Creme of Nature Sulfate-free Moisture & Shine shampoo thrice. I got a little carried away - but in my defence, my hair hadn't been properly cleansed in over 2 months!


[2] Applied warm Organics Hair Mayonnaise and let it sit for about 6 minutes. This has always felt like a strong protein treatment for me (it would appear I'm a bit protein sensitive) so I limit use of this to when I think I need it.


[3] Followed up with warm Herbal Essences Hello Hydration moisturizing conditioner (HEHH) and some castor oil and let it sit for about the same time as the hair mayonnaise. I have been hearing rave reviews from ev-ry-body about this conditioner, so when I finally found it in the supermarket (and for $597 Jamaican Dollars too!), I grabbed it. By the time I was through lathering up, the twists had started unravelling.

[4] T-shirt dried the excess water and let it air dry for about 15 minutes.


[5] Applied my DIY Leave-in (now with HEHH:)) and DIY Shea Butter mix, finger detangled, then re-twisted my hair.

Results?


The Herbal Essences Hello Hydration moisturizing conditioner gave me a lot of slip and after the conditioner was rinsed out, my hair felt sooo soft! As it started to dry however, it was back to its regular coarse self (my hair is naturally coarse to the touch). Despite my hair texture though, the strands felt (somehow) hydrated. Methinks this conditioner is staying! 

I'm also on the look-out for a good deep conditioner, so pleasee throw your suggestions this way!


Overall, my hair looks a lot fuller and appears to be thriving with protective styling. I plan on putting in another protective style (a loose one since my hair didn't get much of a break between styling) on either Saturday or Sunday (my birthday is in the following week \o/), and let that stay in for at least a month or so.

I hope everyone had a great Wash Day as well. Cheers!

Be well,
Gibbie

The Wash Day Experience

16 September 2014

Wash Day - Oldie But Goodie (Or Is It?)

Hello there,

I did a Wash Day about 2 weeks ago but since it was exactly the same as my last post I didn't want to do a repeat. 

This week however, since my Alberto V05 Clarifying Conditioner is finished, I decided to fall back on an oldie but goodie. 

My trusty Tresemme Moisture Rich conditioner

In truth, even if I had more of the V05 Clarifying Conditioner, I would've parked it this wash day anyway. That's because although it clarifies my hair well and is a good rinse out conditioner, my hair would feel a bit dry when I took down the "chiney bumps" (bantu knots) I left out at the back of my head. 

The Tresemme Moisture Rich conditioner is one I have used since the start of my hair journey because 1) it's moisturising 2) you can buy a big bottle of it and, 3) it's cheap. Of late however, it fell in the 'trust issues' department because I've been noticing the effects of its "cones". Tresemme Moisture Rich has a number of "cones" (Dimethicone, Amodimethicone) that, no matter how hard I try to wash out the conditioner, there is still some left in and by weekend I would've had enough build-up that I'll have to clarify again (protective style or not). 

That being said, I could bear the "cone" build-up this time around and since I intend to clarify anytime I use it, it was okay by me. So here goes this #WashDayExperience

[1] Lifted buildup from my scalp using ACV + Water mix (1:4) with some finger-pad-rubbing. 

[2] Co-washed with Tresemme Moisture Rich Conditioner + Warm Water (50/50) mix + Coconut Oil (to the point where my natural hair ends in the Locs). 

[3] Rinsed with cold water. 

[4] Towel dried for 20 minutes. 

[5] Put in my DIY Leave-in. 

[6] Wrapped Locs with scarf (happening now) and I'll keep it on until the next morning. 

When showering I unconsciously turned in the shower and got the body of one-half of the Locs wet (((scream))). I know it's going to take me a little longer to dry but I plan on changing scarves around my locs to prevent that icky feeling against my skin.

I think I'm getting a little tired of these faux locs, probably since they've been in for 7 weeks now, so I'll be taking them out shortly. 

That's all for Wash Day this time around! 


Be well, 
Gibbie
The Wash Day Experience

25 August 2014

Yarn Locs Wash Day (Without the heavy head!)

So this is the second time I've washed my Yarn Locs since they've been installed and tomorrow will make it 4 weeks since they've been in. The first time I washed these locs I was already vowing I would never wash them again and would wear them until it was time to take them out because they are SO HEAVY WHEN WET. But, since then, I've come up with a way to wash the locs without it feeling like the world was literally on my shoulders. And that is..banding.

Yep, BANDING.

It's the same technique used by many a naturalista to stretch their hair without heat and is done by putting scrunchies/ouchless bands/elastic (if they are being put on extensions) at even intervals which elongates the hair. I used the Banding Technique to elongate the hair so only my scalp and where my hair ends in the yarn locs end are cleansed and moisturised, and as such lessened the probability of the entire length of the locs getting wet. Because, Wet Locs = Heavy Locs. I banded the locs at even intervals and left space so I could get to my scalp and individual locs with relative ease. Here's a picture of how I did it:


Now on to my #washdayexperience:

[1] Lifted buildup from my scalp using ACV + Water mix (1:4).

[2] Co-washed (only to the point where my natural hair ends in the Locs) with Alberto VO5 Herbal Escapes Clarifying Conditioner + Warm Water mix and let it sit while I showered.

[3] Rinsed with cold water.

[4] Air dried and T-shirt dried for about 15 minutes.

[5] Put in my DIY Leave-in (again, only to where I thought my natural hair ended).

[6] Wrapped Locs with scarf and kept it on until the next morning.

It still takes a while to dry but majority of the locs weren't wet and as such was not heavy on the head. To avoid that gross feeling of damp extensions on your shoulder or body, just wrap with a scarf and secure it. Ta-da! Wash Day over!

Dassit!

Be well,
Gibbie


The Wash Day Experience

11 August 2014

Yarn Locs: Tips During and After Install & Hair Care (Part 2)

Continuing from Part 1, this post looks at my hair care regimen while my hair is in this Yarn Loc style. I was actually waiting on my first wash day to come around before publishing this post. 

Wash Routine


(Sidenote: If your hair is anything like mine, Co-washing alone will not help - I tried). 

  • Shampoo with any diluted cheapie shampoo OR use ACV + Water mix to lift buildup from scalp.
  • Co-wash with Tressemme Moisture & Water Alberto VO5 Clarifying Conditioner (60% conditioner/40% warm water mix)
  • Rinse with Cold Water. 
  • T-Shirt Dry. I try to wring out the excess water out of the locs because they are heavy when wet. No joke.

Moisture Routine

  • DIY Leave in mix once or twice a week. I fully saturate the Yarn Locs to where I think my hair ends so the mix reaches to my natural hair underneath.

In Between Routine

  • Moisturise the first row of locs I took out (at the back - in 3 chiney bumps/bantu knots) at least once a week. I moisturise with my DIY Leave in mix and my shea butter mix. Here's a picture of the leave out:

  • ACV + Water mix on scalp to "lift" buildup and relieve itching (my hair itches a lot!)
  • Castor Oil or Coconut Oil scalp massages to loosen up any wraps that I might have re-done (for whatever reason - I'm like that). I also use the oil to massage my scalp whenever my hair itches.

DASSIT. 


Be well,
Gibbie

10 August 2014

Yarn Locs: Tips During and After Install & Hair Care (Part 1)

As promised, I've been compiling some information on Yarn Locs (a.k.a Yarn Wraps/Faux Locs) to do a post on the style since I currently have it in. So here goes: 

Tips: During & After the install 


Yarn Locs, as I said in previous post here, are done by braiding or twisting your own hair with yarn and then wrapping that braid or twist around the loc. 

Tip #1: When doing the braid or twist, take the amount of yarn you need (depends on the thickness of the loc/wrap you are trying to achieve, and ensure the braid/twist is the length you want the wrap to be. I advise that the braid be a little more than how you want it to end up (just in case).

Additionally, When wrapping, ensure the pieces of yarn being used to wrap the braid are longer than the braided/twisted yarn itself. I would say a little more than double the length of the braided/twisted yarn. It is much easier to cut then excess yarn left after wrapping than to be repeatedly adding more yarn while wrapping.

Sidenote: In between the braiding and wrapping of your Yarn Locs, remember to moisturise your natural hair with your LOC/Moisturise & Seal method before you've completed your yarn wrap/loc. As I said in my previous post, this style is like the ultimate protective style i.e., your hair is significantly/completely covered. It's best to lock in that moisture before the wrap is done.

Tip #2: You don't have to, but if you're doing the yarn locs for the first time and you're a beginner, I would advise that you use 3 pieces of yarn to wrap your braided or twisted yarn. Why? 3 pieces of yarn have more coverage that 2 pieces, which make it harder for you to not miss any spaces that weren't covered with 2 pieces. 

Tip #3: After wrapping the braid/twist, make about 2 or 3 knots at the end of the wrap. Ensure the knots are made around the wrap and under the wrap to secure it. Also ensure you seal the wrap/loc by burning it with a lighter or match. 

Tip #4: Yarn Locs have to be wrapped taut to prevent unravelling. But that shouldn't be done tight that you'll have headaches for days. Ensure the person doing the style does not braid or twist the style tight or grip the sectioned hair too tight. It is not necessary as the braid/twist will be covered.

Tip #5: Do not start the wrap at your scalp or too close to your scalp. It is advisable to start at the beginning of the braid or twist. You can also start wrapping the loc a little looser at the scalp, then wrap tighter or taut continuing down the length of the wrap. This will prevent stress on the scalp and when the wrap is completed and sealed, the base and scalp will feel a bit looser.

Tip #6:  For a polished look, dip locs in hot water (as you would if you were doing a braided or twisted extension style). This also aids in softening them up a bit. Also note that the slender the loc/wrap, the more flexible it will be overall.

What To Expect After Install?


There will be some discomfort when sleeping and styling for the first couple of days, especially if your hair care professional did the braids tight and/or started wrapping at the scalp tightly. The wraps will feel stiff after the install. The hot water will loosen the locs up but ultimately, if you're feeling pain after a week, I think you should take out the ones hurting the most and re-do them. That's what I did when my hair was done a little too tight.

Additionally, some locs will unravel. If it happens, just cut the end of the loc, re-do it, knot it and burn the ends (and close to the ends) lightly. Don't sweat it.

In Part 2 I'll be detailing my hair care regimen while my hair is in these Yarn Locs. Stay tuned :).

Be well,
Gibbie

Disclaimer: The abovementioned post are just some helpful hints I picked up before my install (on YouTube), after my install (when some braids started unravelling) and info I used to redo them that I picked up via trial and error and YouTube. I am not a licensed hair practitioner/consultant or hair anybody :). Please enjoy the post.

04 August 2014

Protective Styling It: Yarn Locs/Faux Locs

I've been wearing my TWA out for a little bit and I decided to start moving further towards my hair goals; a major part of that being low (or no) manipulation and/or protective styling. I still haven't gotten the knack of combing/styling my hair this short and I thought it was best to put it up in a medium - long term style before I started damaging my hair. So here we are.

Yarn Wraps

The Yarn Wrap Style is where you use yarn (usually 100% acrylic yarn) to twist or braid your hair and thereafter wrap more yarn around that twist or braid. It is (I think), the ultimate protective style as the entire strand of your hair is covered, leaving only your scalp from showing. It is pretty easy to do (so easy I can do it :)) and there are countless tutorials on YouTube showing how it is done.

How long it will take depends on the length and size of the braids you want to be done but needless to say, it isn't a "quick style"..it is going to take you some hours to do.

About My Yarn Wraps

Colour: Black
Duration: 12 1/2 Hours 
Length: Shoulder - Collar bone length
Thickness of wraps: Medium
Yarn type: Red Heart 100% Acrylic Yarn & Zola 100% Acrylic Yarn
Price: Red Heart (Super Saver) $1,200 JMD & Zola (3 Small packs) @ $70 JMD per pack 
Where I got the yarn: Woolworth

My Yarn Wraps were done last week by a hair braider who was doing this style for the first time, so we were basically going off of what we saw on YouTube. She got the hang of it quickly. The length of my yarn wraps are about collar bone/shoulder length and it took about 10 hours to do majority of it (we ran out of yarn) and I'd say about 2 1/2 hours to do the rest. I did the remaining pieces and re-did some I thought were too tight. Those are mainly at the right side of my head. Here are some pictures of how it turned out (taken today - a week later):


I think they're holding up well considering I don't "care" extensions well and I haven't slept with a satin bonnet (only a satin 'pillowcase' - satin fabric over my pillow) since I got them done. It has been said that as the roots get more fuzzy, it looks even more natural looking. I'm pretty sure I'm on my way there.

When they are just done, you might feel some discomfort for a couple of days because 1) the wraps/braids will be stiff so sleeping well might be an issue for some and 2) some of the wraps/braids need a couple of days to "loosen" a bit. Scalp massages as well aid in this regard. It is advisable that when getting them done to not start wrapping at the root/scalp but at the beginning of the braid or twist..and even then wrap this section taut, but not tight.

I'm hoping to keep these in for 2 months (since they look like they handle well and they took so long to do) ..but I've never kept in a style that long (itchy scalp), so we'll see.

I'll be doing a post on what to expect after getting Yarn Wraps, tips and a hair care routine I've been doing.

Be well,
Gibbie